When we told Wasim he could only use a smartphone to capture iconic Los Angeles landmarks, his initial reaction was, “Say what? You sadistic bastards!”
Aside from being a pro landscape, travel and architectural photographer, Wasim is a rare breed—the native Angeleno kind. This means he eats tacos by day and ... eats tacos by night. But when he’s not consuming Mexican food or exploring the great outdoors, the photographer captures humbling images that blur the line between natural and industrial.
The glutton-for-punishment that he is, Wasim pushed our “smartphone only” challenge even further. He chose to shoot only in monochrome, an approach to depicting iconic LA he describes as: “pseudo-modern-post-retro-contemporary-punk-noir style.”
If this sounds like a bunch of fluffy discourse to you, keep in mind that LA has a weakness for mid-century modern architecture, Old Hollywood and giant donuts.
So scroll on for a nostalgic, visual stroll through seven iconic landmarks in Los Angeles shot in monochrome. Plus, Wasim’s tips on how to nab the money shot:
Randy's Donuts

Wasim Muklashy: First stop? Perhaps one of the city’s most famous historical landmarks, Randy’s Donuts! Breakfast is the most important meal of the day, right? And dude … donuts.
Pro-tip: The composition of this shot was key as the building is positioned just feet away from a busy street corner, making it tough to capture the entire scene. To do so, I had to identify the key elements I wanted in the image: wispy SoCal clouds, the donut (obviously) and people lined up to order. So, I backed up until I was two feet into the street and on my knees to fit those three ingredients in the shot.
Walt Disney Concert Hall
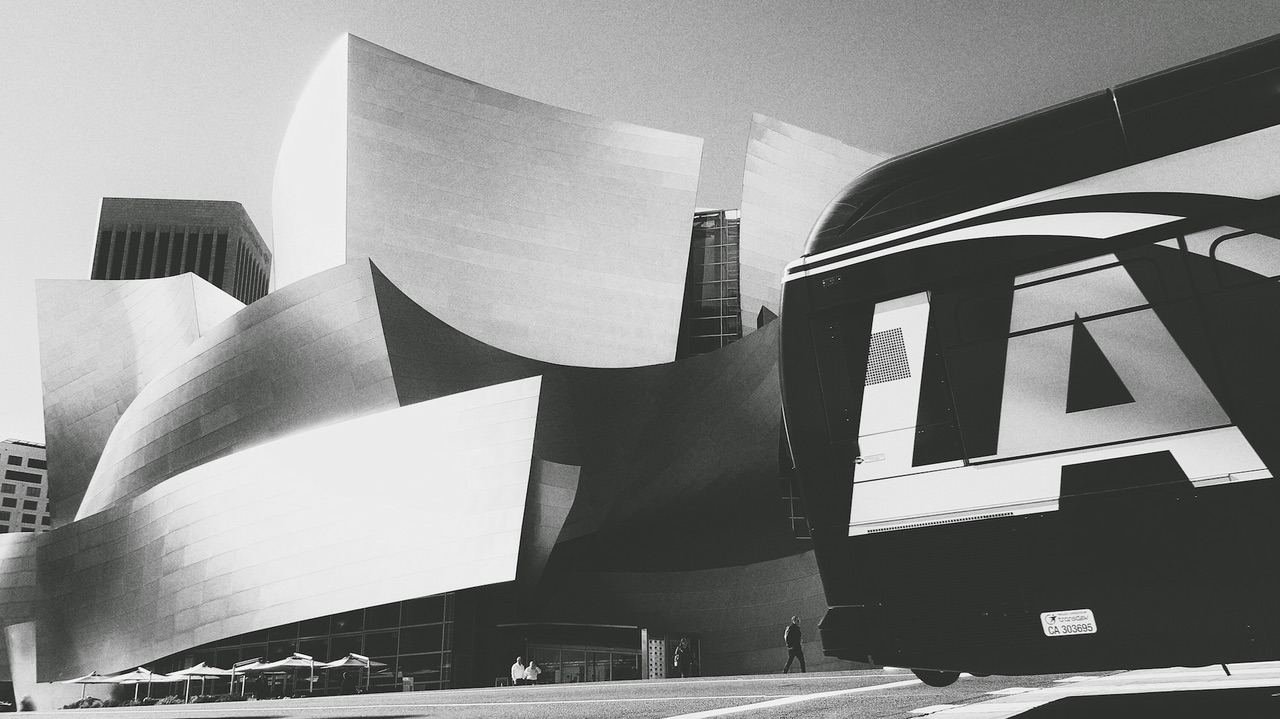
WM: The next stop on the iconic landmark tour is Disney Hall in DTLA. While this particular structure didn’t exist when I was growing up here, I’ve just always loved the fancifully ridiculous design that Frank Gehry employed on this one.
Pro-tip: In photography, it’s always good practice to pre-visualize the scene you’d like to capture, but sometimes serendipity ends up being your best friend. This was one of those times. After circling every corner and crevice of the building, even making my way across the street on top of a parking garage, I still couldn’t visualize the money shot. Eventually, I found an unobstructed angle to get the whole of the building, and accidentally caught the tail end of a bus that not only immediately ID’ed LA, but felt like a natural extension of the building’s curves. Perfect.
The Magic Castle

WM: Next, I headed towards one of my favorite spots in town, The Magic Castle— which is actually an exclusive black-tie supper club. The only way in is by invite from a magician who performs there. So, befriend a magician stat for a chance to explore the secret passageways, card trick parlors and to get your own magic on. If nothing else, the steaks are superb!
Pro-tip: For this image, I wanted a sense of mystery. To keep the viewer longing for more, I chose to focus on a single vignette of the structure, using the stained glass “Magic Castle” and owl as my points of intrigue. Additionally, the low-angle shot gives viewers the sense that the building exerts a certain power (this works with people too). Deepening the blacks in post-processing helped make the whites pop out even more, guiding attention towards my chosen focal points.
The Griffith Observatory

WM: Just up the hill from the Magic Castle lies the Griffith Observatory. This is perhaps one of the most popular tourist destinations in the city. With sweeping views and a massive telescope and planetarium located a mere hiking trail away from the Hollywood Sign, how could it not be?
Pro-tip: More often than not, Griffith Observatory photos are of the building itself, which is ironic considering the whole point of an observatory is to use its vantage point to, ya know, observe! I tried to create a sense of incomplete motion while leading the viewer in a certain direction—to an observation point. In this case, the stairs lead us up into the view of the city. The tough part here was the contrast in light; the stairs were shadowed and the city was bright in the afternoon sun. So, I used the HDR feature to get some detail in the stairs while not overexposing the city. Then in post on Snapseed, I opened up the shadows enough without sacrificing quality. I also used Snapseed’s ‘Transform’ feature, in which you can shift the horizontal or vertical plane. corrected for a slanted horizon, while still maintaining a perfectly vertical wall-line. I then applied a light contrast black and white filter, and a warm noir filter.
Venice Beach

WM: Next stop? My old stomping grounds … Venice! Down by the boardwalk, I’ve always been drawn to the Venice Skate Park and the Venice Public Art Walls—huge concrete slabs in perpetual street art evolution. Basically, if someone visited the walls next week, they’d see something totally different than what I saw last week. I grew up in the area, and the walls and the skate park represent Venice’s culture—constant, colorful, in motion, vibrant, weird and best kept far, far away from the mainstream.
Pro-tip: This one took more advanced technique. It’s hard enough to get a fast moving object in motion to do what you want on a proper SLR camera, so using a smartphone was sure to pose a challenge. The idea was to capture the silhouette of a skater doing a rail-side with the outlines of the graffiti walls and palm trees in the distance behind him to provide a sense of the location. The Note 5’s “burst mode” (there’s a similar function on iOS) was essential to getting this one right. Well, that, and waiting for a dude in a Rastafarian-colored grass skirt to finish his joint and move from the spot I needed to frame my shot.
The Getty Center

WM: After the Venice Art Walls, it was high time for some high art. Cue the Richard Meier designed hilltop haven: The Getty Center Museum. I find myself here at least once every couple months to grease the hamster wheels of my imagination and get my culture on. Not only can you spend hours perusing the exhibits—everything from Renaissance-era tapestries to contemporary Japanese photography—but you can also bring a picnic basket and a bottle of wine to enjoy in the insanely gorgeous gardens. In the summer, they even have free concerts in the courtyard.
Pro-tip: As soon as I got off the monorail at the top of the hill, I had figured out my composition: the smooth sexy curves of the building reminiscent of a grand piano, softly lit by the late-afternoon sun, diffused by a thin layer of cotton candy clouds and accented by the crescent moon. It was like poetry revealing itself before my very eyes … or my phone lens. Sometimes in situations like this, the camera wants to focus too brightly to account for shadows, or too dark to account for the sky, so I used the exposure compensation feature here to get a good balance. I also turned on the HDR feature, which takes three exposures and blends them together. This way, I knew that I would have enough information to edit the image in post.
Paramount Ranch

WM: For my final stop, I figured it was time to take a break from city traffic and escape into the Santa Monica Mountains. At 153,000 acres, these babies comprise the world’s largest urban national park, all within less than 30 minutes from DTLA. Stretching from Malibu to Santa Monica, the Santa Monica Mountains are home to everything from hiking and biking trails to deer, coyotes, owls, mountain lions, hippies and Paramount Ranch. What is Paramount Ranch, you ask? It’s an Old Western town that was used to shoot several of Hollywood’s biggest hits, like M*A*S*H and Butch Cassidy and the Sundance Kid.
Pro-tip: It’s not hard to get a good shot at Paramount Ranch, considering it was literally designed as a movie set. Everything from the layout to the facades are candy to a camera lens. Here, it is essential to use lines and shadows to your advantage. I wanted the feel of an eerie, abandoned western town at high noon, where residents hide in their abodes in anticipation of a wild duel. Using the shadow on the ground to mirror the roof of the building on the left helped add some symmetry and bring attention to shapes and lines. And as with any architectural photography: to avoid getting converging lines (when vertical lines and walls appear as if they’ll cross paths in the sky), hold the camera at the midpoint between the floor and the ceiling of the nearest structure. This will help avoid vertical line distortion.

All of these images were shot on Wasim's beloved Samsung Galaxy Note 5 and edited and processed completely in Snapseed, which is available for both Android and iOS. He used a mixture of the ‘Noir’ and ‘Black & White’ filter sets mixed with the occasional ‘Grain’ filter sets to add a bit of that old school ‘film’ feel to it. The photographer then used the manual controls to adjust the contrast levels to what pleased his eye. For more of his photos, check out WasimOfNazareth.com and follow him on Instagram @WasimOfNazareth.